I Dream of SVG Coding
First published: Monday May 27th, 2024
Report this blog
Introduction: I Dream of Quizzes
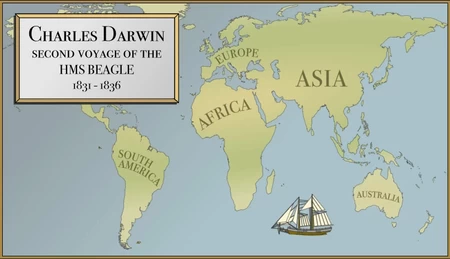
There are many types of quiz on JetPunk. General trivia. Rote memorization. Logical puzzles. Procedural knowledge. Memorization. I feel that some quizzes, however, go beyond trivial, beyond educational, and are beautifully engaging. The map quiz below for Charles Darwin's voyage is wonderfully illustrated and its animations keep the quiz taker fully engaged. It'd be easy to slap together a quiz that asked where Darwin went. It could even have maps or hints to nudge the quiz taker towards the correct answer and avoid the dreaded feeling of frustration.
This quiz is perfect. It has a Platonic essence of quiz-ness--full-quiz engagement. Sumerian gods look upon this quiz and weep. Enlil weeps.
But I wept for a different reason... amazing SVG quizzes inspired me to dream. I saw quizzes in my dreams, but they sat plumply out of reach.
When Ideas Surpass Ability
What does it take to make great quizzes--those few quizzes that connect to a quiz taker? Quizzes that promote erudition? Quizzes that create a sense of joy and wonder in other JetPunkers? What are the quizzes that you can hang your hat on and feel pride, that you can feel justified to spend a couple hours per day for two weeks perfecting, that you can spend your entire lunch hour plodding away at? How could someone like me make a quiz with pure quiz-ness? Let's break down the Darwin quiz into three parts, parts I argue all quizzes have to some degree.
1. Mechanics: this is simply a geography quiz. The map shows a place, identify the country.
2. Experience: someone with no knowledge of Darwin can take this quiz, not get frustrated, and learn the route Darwin took. It is educational!
3. Presentation: The moving line on the map perfectly conveys a sense of Victorian exploration. The map is beautiful but not gawdy. The animations are smooth and satisfying.
Looking at my favourite quizmakers, I see such ability... Style... Artistry... Advanced coding. I tip my hat to Elboy, to overtired, to baptistegorce, to Stewart, to the many JetPunkers who imagine a quiz and set out to make their vision a reality without compromise. When I think of my quiz ideas, I realize that I had compromised quite a bit in my first year of quiz making.
Quiz-Making without SVGs and Yattering on About Myself
I have an excel spreadsheet with 750 words that start with "A". Words that I found somewhat uncommon, but not too uncommon, and are somewhat interesting, but not too interesting. How many hours did I spend sifting through literally every entry on Merriam-Webster.com and the OED? I'm sure if I tracked the hours that you would leave kind comments that gently probe my mental wellbeing. But I've made many, many SAT word quizzes. Mechanically, they're matching quizzes. Experientially, the user has a chance to use context clues to learn new words and avoid frustration. Presentation-wise, however, they are not beautiful. They are not perfect. I enjoyed making them, and my many other word quizzes. I got thousands of takes from them, but I knew I wanted to make something better. I will probably do a daily/weekly "A Words" series of quizzes eventually and maybe more of the alphabet if I don't tucker out.
Long story short, I had many quiz ideas that were quirky and fun, but they were stylistically lacking. They didn't use SVG or InkScape at all! I wanted to make something with more creativity, more beauty, more quiz-ness.
Inkscape is hard... But Coding is Easy?
SVG are the files that JetPunk uses for maps and other animated content. It's usually edited with Inkscape or something like it, I found InkScape difficult. So much so, that I've abandoned several projects after a couple hours because of my limited artistic skill and how hard it was to get even basic animations to work. I'm sure there's a way, but I just wasn't getting it. I had an idea of taking famous paintings and hiding objects within them (perhaps Jeppy?), but lordy, that was difficult. I have an idea for making a whole set of quizzes that share a theme and require a great deal of style and artistry... one day... one day...
But more recently I have come to understand CSS and SVG programming significantly better. Reading basic guides on the Internet and using ChatGPT have been a revelation. Many of my ideas that I found too hard to do with InkScape are very easily done with coding, and bug fixing is actually pretty easy with ChatGPT. I'm excited. I feel that I can make phenomenally better quizzes today than I could last year. So, here's an example of my coding:
Yup. That's just Notepad. You can write entire codes for SVG in Notepad. You can open InkScape projects and edit them in Notepad, too. For some reason I found Notepad far easier than InkScape. Rather than drawing a rectangle in inkscape, I can create a rectangle element through code!
<rect width="20%" height="10%" fill="blue" class="example"/>
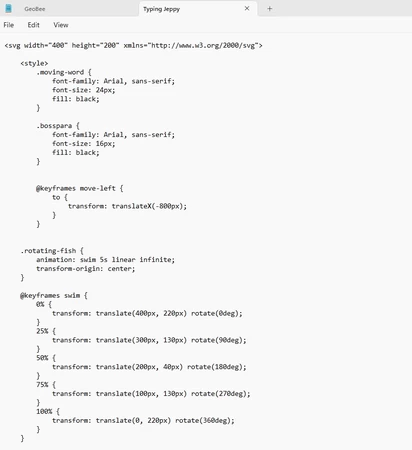
Typing with Jeppy was made entirely in Notepad, with the exception of copy/pasting the code for Jeppy from another SVG. I also made Jtheppy's Evil Geography with Notepad (although I kinda messed up the code for that one and had to download an unformatted test version from JetPunk). Let's go through some basics for SVG coding!
Creating your SVG File
You can open SVG files in a few ways by right-clicking on them and hovering over "Open with...". So first, grab a blank SVG file so that it works with JetPunk (you can't just upload a Notepad document to JetPunk).
Now that you have an SVG file, you can "Open with..." Notepad. This is where I do my coding. You can also "Open with..." a web browser, which would allow you to see how the coding works when opened.
Be careful, though, any coding you do might not actually work with JetPunk, so make sure you upload the SVG and test it out somewhat regularly... and make backup SVG files as you make significant changes! I learned this the hard way with Jtheppy.
One other thing to point out: It's actually pretty easy to manually edit an Inkscape file in notepad. You can even copy/paste elements in SVG that are impossible to code. I borrowed the Jeppy SVG without much issue.
Let's make an SVG!
Every SVG opens with '<svg>' and closes with '</svg>'. There are a couple of things to add to the '<svg>' part, though. You have to include what set of rules the SVG will follow. I typically have use xmlns="http://www.w3.org/2000/svg". Also, let's make the viewing area of the SVG 600 pixels wide and 300 pixels in height.
<svg width="600" height="300" xmlns="http://www.w3.org/2000/svg">
</svg>
And that is a happy little functioning SVG file. It is completely blank, but it opens without errors. Yay!

Adding Elements
Let's make a big black rectangle that serves as a background to the SVG. To do this, all we need to do is add a rectangle element that takes up the whole viewing area.
<rect width="600" height="300"/>
This works, but for a background it makes more sense to use:
<rect width="100%" height="100%"/>
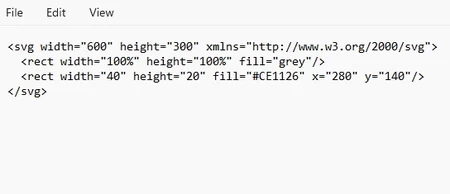
This way you can change your SVG's viewing dimensions and the background will still take up the whole screen! You can also set the colour (otherwise it defaults to black). Let's pick grey.
<rect width="100%" height="100%" fill="grey"/>
Let's also add a second smaller rectangle so we can learn a bit more. Let's make the new rectangle 20% of the viewable area wide and 10% of the height. I want this new rectangle to be the red from the Detroit Red Wings jersey. The hexcode (a numerical colour system) is #CE1126.
<rect width="20%" height="10%" fill="#CE1126"/>
If I wanted the rectangle's dimensions to be based on pixels, I'd just give numbers. Let's switch it to pixels instead.
<rect width="40" height="20" fill="#CE1126"/>
OK, so we now have a red rectangle added to the SVG. By default, it'd be put at the top left of the screen. Let's manually position it by giving it x and y values.
<rect width="40" height=20" fill="#CE1126" x="280" y="140"/>
Now we have a 40x20 pixel red rectangle approximately in the middle of the SVG's grey background. Sweet.

Adding Text Elements and Making JetPunk-Useable id
Now let's add some text. It's very similar to the rectangle element. By using math, I'll put white text in the red rectangle. Also note that there is a slightly different format. You open a text element with <text>, write what you want, and close it with </text>.
<text x="285" y="155" font-size="11" fill="white">Detroit</text>
This gives us:

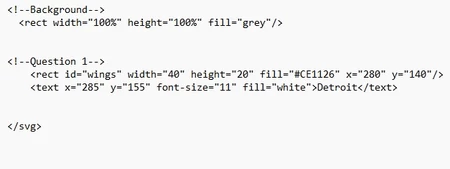
IMPORTANT: ORDER MATTERS! The grey background code appears first so it is illustrated first. Then comes the red rectangle code, so it is put on top of the grey rectangle, then the text code. If you put the text code first then it'll be covered up by the grey and red rectangles!
Great, we have a text element. Now let's add an id that JetPunk can use. All you need to do is write "id=____" in the code for a shape. Let's use id="wings". We could use anything we want, but you will usually want each element to have a unique id. Let's put it at the front of the red rectangle's code, first because the id is important for us JetPunkers!
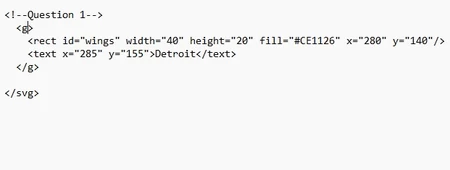
Let's also add a marker to show us that this will correspond to Question 1. The <!-- --> won't be read as code, so it is a good way to keep things organized.
Now we can save our code and upload it to a JetPunk quiz using the usual method. Assuming you're opening an SVG file in notepad, JetPunk will see the file as an SVG file.
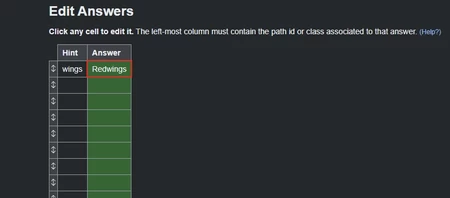
Because the rectangle has id="wings", we have to make the Hint "wings". I made the answer "Redwings", but that could be whatever I want. The important thing here is that the rectangle should turn green when the answer is correct.
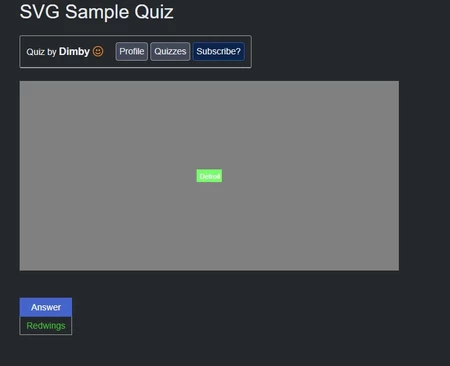
And then we can test it out and we get a green rectangle when we get the answer correct! For some reason using that id on the text doesn't turn the text green, but it seems to work on most shapes.
<style> & classes
What if we wanted to make sure that all questions have a similar format? For instance, let's say we want all writing from here on out to have the same properties that "Detroit" has. This is one of the ways that classes and <style> can be used. If you've done any basic programming with JetPunk, you're probably familiar with putting <style> commands in the comment section of JetPunk. You can also just put <style> commands into your SVG, which is what we will do.
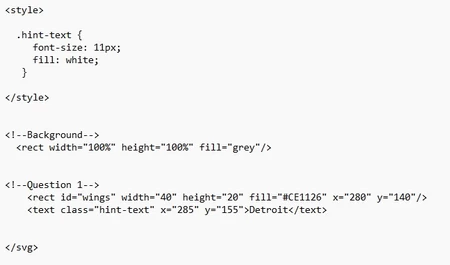
<style> gives rules for how elements in your code should be styled. The rules are written between <style> and </style> brackets. Let's look at our style for Detroit. Let's rewrite this to use <style>.
Old code: <text x="285" y="155" font-size="11" fill="white">Detroit</text>
New code:
Let's break this down:
<style>
.hint-text {
font-size: 11px;
fill: white;
}
</style>
.hint-text indicates that the class "hint-text" should have the format in the squiggly brackets. Then you can give any text element the class "hint-text", and it will automatically have the font-size 11px and will be filled in white. If you want New York to have the same font, just give it the same class.
<text class="text-hint">New York</text>. This would produce New York in white text.
Using <style> format and classes will look the same as the old code. This can save a lot of time if you have multiple text elements that should all use the same style, especially if you want to change the font-size or colour or something. Also, keep in mind that class names are chosen by you and you can pick whatever you want, for the most part. Some classes are used by JetPunk, though, so keep that in mind.
Groups & Animations
To finish up, let's add some animation to this. Let's make the text and rectangle move a bit. To make them move together, let's put them in a group.
Now the red rectangle and the text that appears in it will be grouped. FYI, you can put any number of elements in a group, even other groups! Grouping two elements won't change much, but it allows us to make things happen to all the elements as if they were one thing.
Now, let's get this group to move! Let's give this group the class "moving" since we're going to give it a basic moving animation. To do that, just go into that first <g> and give it a class.
<g class="moving">
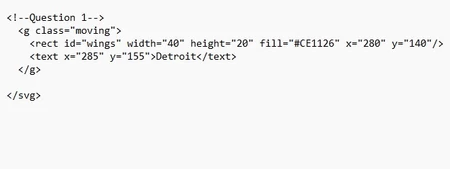
Why do we need to give it a class? That's because we are going to use <style> commands to make anything with the "moving" class move. We could name the class whatever we want, but "moving" works for us and makes sense.
Now in the same way that we gave style command to the class with .hint-text ,
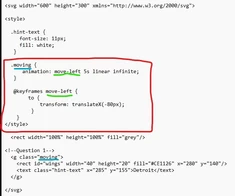
we can give style commands to .moving . These style commands include animation! Let's use the keyframes command to make a simple movement to the left. Let's call this movement "move-left", and then give everything with the class "moving" the command to follow that animation. Let's look at the code.
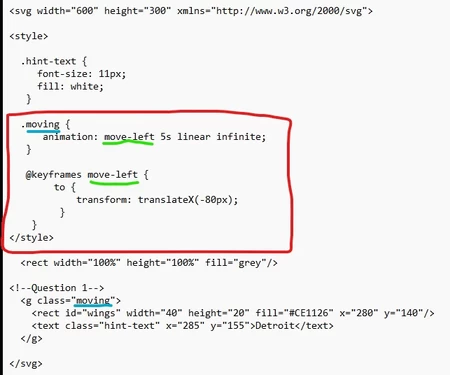
This will make the rectangle and text move to the left 80 pixels, then warp back to the original position. Let's break down how this works:
"@keyframes move-left { }" defines a new animation called "move-left". We are looking to transform the group by moving it to the left. So we get the animation "transform: translateX(-80px);"
Here, "translate" just means movement, X means the X-axis, and -80px means 80 pixels to the left. You can look up other transformations or animations types if you want to do something else!
Now that we've defined our animation and called it "move-left", let's apply that animation to the class we created.
".moving { animation: move-left 5s linear infinite; }
".moving" tells everything with class="moving" to follow this style. "move-left" is what we named the animation (underlined in lime). "5s" just tells the animation to take 5 seconds. "linear" just means to play forward, and "infinite" just means it'll replay the animation when it finishes.
Just to reiterate: "move-left" and "moving" are arbitrary names. I could have called it "pancakes" and "tottentot" and the code would have worked just the same.
Now open it in web explorer or in JetPunk and you'll see a moving animation! Then we're done! And I'm not profreading this because it was already a lot of tiping.

What's Possible?
I feel that amazing projects are at the tips of all of our fingers on JetPunk. While there are some limitations to the site (for obvious security reasons you cannot run much script on a JetPunk quiz), quizzes become so much more engaging with basic coding. I find it astounding that I went from virtually no experience with coding to making Typing with Jeppy or Jtheppy's Evil Geography in a few weeks each.
It doesn't open at: www.w3.org/2000/svg
When the answer is guessed, some pixels appear.
But I've run into some problems - the pixels start already on the screen, and I can't make one answer trigger multiple pixels.
Edit: It's not working when I comment it...
< !--Question 1-- >
< rect id="Banana1" width="15" height="15" fill="#FFE135" x="15" y="90"/ >
< rect id="Banana1" width="15" height="15" fill="#FFE135" x="30" y="120"/ >
< rect id="Banana1" width="15" height="15" fill="#FFE135" x="15" y="120"/ >
< rect id="Banana1" width="15" height="15" fill="#FFE135" x="45" y="150"/ >
.svg-holder .example { opacity="0.001";}
.svg-holder .example.svg-correct {opacity="1";}
In the 'answers' section of the quiz, I have:
Hint=Banana1
Answer=BANANA
Hint=Banana2
Answer=BANANA
And so on (in the hint and answer columns.)
EDIT: Ok, I'll try that.
.svg-holder .example { opacity="0.001";}
.svg-holder .example.svg-correct {opacity="1";}
I've gotten ChatGPT to help, but all it's done is change it to:
< style >
[class^="Banana"] {
opacity: 0.001;
}
[class^="Banana"].svg-correct {
opacity: 1;
}
< /style >
It starts disappeared, but when guessed it doesn't work. Would you know how to fix it, or should I ask Kilo how he accomplished it?
In case you need, the rest of the code is still like this:
< !--Question 1-- >
< rect width="15" height="15" fill="#FFE135" x="15" y="90"/ >
< rect width="15" height="15" fill="#FFE135" x="30" y="120"/ >
< rect width="15" height="15" fill="#FFE135" x="15" y="120"/ >
< rect width="15" height="15" fill="#FFE135" x="45" y="150"/ >
Do I need to group it, or something?
This is because the svg-holder is its own element and the style has to go looking inside that element, so the space means “look inside things with this class for the classes after the space”. Also, I usually put jetpunk specific code in the quiz explanation box. Not sure if you have to, but it generally works.
I've switched tactics to making the normal path white, and when guessed, I overide the colour to the desired colour, but the thing isn't working.
I currently have:
(between style things)
.svg-holder .svg-correct { fill: #FFE135 !important; }
Is there something I need to change? I copied it directly from the SVG guide.
< style >
.svg-holder .svg-correct {
opacity: 1;
transition: all 0.5s;
}
< style >
Right in your quiz description area.
Also, to be clear, are they turning green? When you put the answer in? If they’re not turning green or anything at all, it means your hints in JetPunk aren’t matched to the classes you have.
The class of all your pixels need to match the hint. In the < rect > elements you’re making, make them have a class that corresponds to the hint in jetpunk. You just do class equals "Banana1" or whatever, and in JetPunk you make the hint Banana1.
The answer turns green, when I put the answer in (and I would prefer a different colour for my banana...)
Thanks for the quiz instructions thing!
I do have classes:
< rect width="15" height="15" fill="#FFFFFF" x="15" y="90"/ >
It's set on white, so when the answer is guessed, the desired shade of yellow appears.
Hey, I found how to do stuff. Thanks Dimby! (Though I might come back for more help another time)