How To Master Minesweeper
First published: Saturday February 15th, 2025
Report this blog
Basics
- On a minesweeper board, there will be a set number of mines and safe squares. The first click will always be safe.
- Mines are invisible until you either win or lose the game, and are usually detonated by a certain symbol. They are placed randomly around the board.
- Each square displays the number of mines it borders on all sides, including diagonals.
- The goal is to use this information to clear all the safe spaces, leaving the mines left. If you click a mine, you lose and must start over.
- Usually, you are able to 'flag' mines by right clicking.

Starting
The first click will always be safe, so you should use this starting move to the best of your ability. On the first click, the minesweeper board will either be generated OR the mine will 'move'. Every empty tile part of that group of tiles will be cleared, along with some numbers. Clicking an empty tile during the rest of the game will do the same, however it will usually be fewer tiles.
Generally, it's best to start in either the corner or center. This allows the best chance at revealing the most tiles. Another good strategy to use is clicking the center and all four corners, though this does come with a risk.
Generally you will most frequently see 1s, 2s, and 3s, with a few 4s or even 5s, rarely. Any number above five is possible, but is very rare. Also, an important note: not every minesweeper board is a guaranteed solve. Many board require guessing. Some sites are coded so that the solve is guaranteed, but most are not. However, you can increase your chances using tactical strategies. Here are them all!
Tactics
Perfect Borders
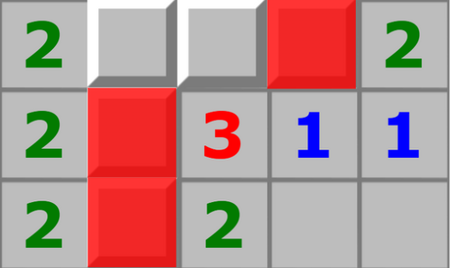
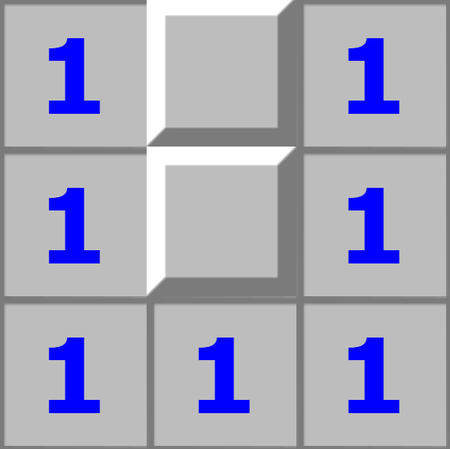
This is simple. If a square displays the same number of unrevealed squares it borders, then all the bordering squares are mines.
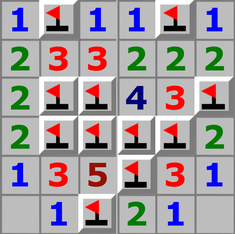
In this first example, you can pick out three mines. The one on the edge only borders one tile, meaning that that tile is a guaranteed mine (ones commonly border corners, making them useful quite useful). Same for 2 in the corner, it borders two tiles, which we now know are mines.
Here, the three and four give away lots of information. The 4 only borders four tiles, so all of them are mines. The 3 borders three tiles (usually most threes are against a line of three), giving you more info. So, all 5 unrevealed tiles in this picture are mines.
Additionally, all squares bordering empty squares are safe, though this usually isn't useful.
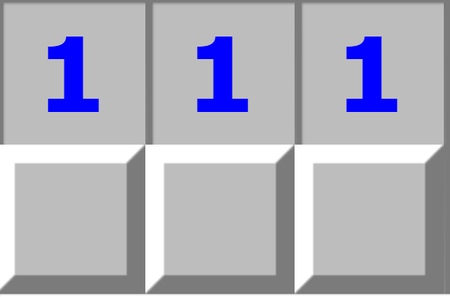
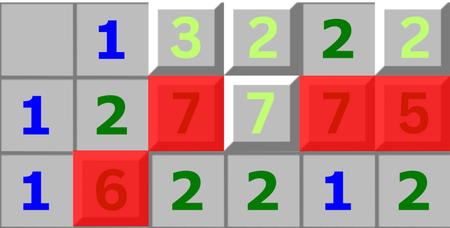
Fullfilled Requirements
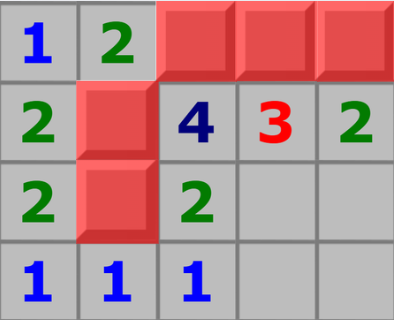
This concept is also simple - if a number already borders the number of mines displayed, every tile bordering the number will be safe. Here's an example:
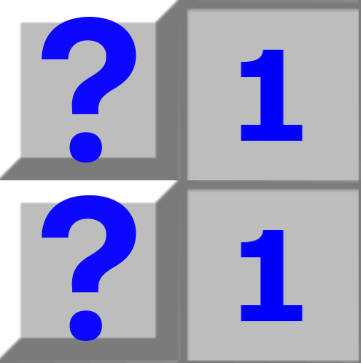
In this first one, the 1s surrounding the flag (mine) already border a known mine. This means that ALL the tiles touching these ones are safe, because they have already 'fullfilled their requirement' of the mines they must border.
Another example here, where two mines are revealed because of the higher 2. Because of this, the lower 2 already borders two known mines, so EVERY square bordering that 2 is a safe square.
Same for the three ones on the top. Since they already border one mine, all the surrounding squares are safe.
Generally these two tactics are the only thing you need to complete a minesweeper game! However, there are a few other ways to strategize if you want to become a minesweeper wizard.
Other Strategies
These strategies are not necessary, but are useful if you find yourself in a pickle (though that'd be gross and would burn your eyes).
Patterns
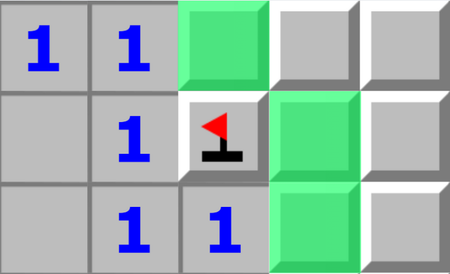
There are certain shapes or patterns that reveal mines. Training yourself to recognize them can improve your speed. Here's an example:
Seems so simple, right? You can just use the ones in the corner to find that the central square is a mine. However, recognizing simple patterns like this, you can skip the perfect border step and clear the remaining squares, saving thinking time. You also don't have to waste time flagging it because it's isolated.
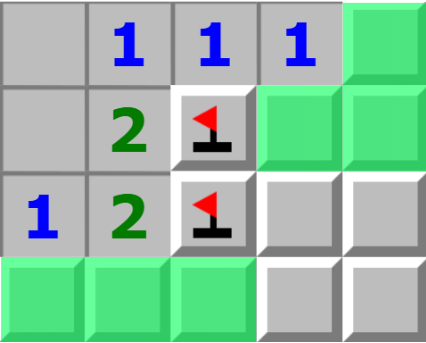
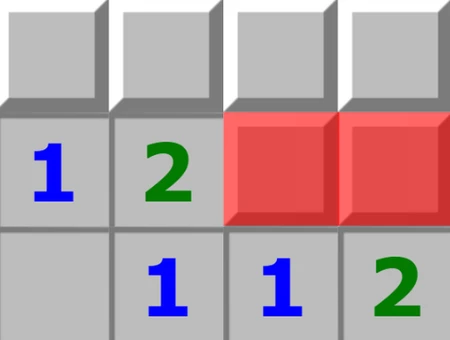
Sometimes patterns are necessary. In this second example, you have three unrevealed squares and three ones.
You could use logic. If a mine is on one of the edges here, the one on the other edge would need a mine of its own to border. However, this would make the center one a two, so we know it has to be in the middle.
Using that logic in a game? Takes forever. Recognize the pattern, and this scenario will take a second instead of ten. This is the simplest example, but looking for contradictions (e.g. if the mine is here, will it contradict the other numbers) is a great strategy to use.
Strategic Guessing
There are many incidents where you'll have to make a guess on where the mine is. However, making an educated guess based on probability will improve your chances.
As stated before, some scenarios are straight up impossible to solve without luck, so hope you get lucky. For the next example, let's ignore all the other strategies we have. For this strategy, we will give all the unrevealed squares a number based on the revealed numbers. So, if a square borders a 2, we will add two to the imaginary number, if it also borders a 1, it'll be a 3. Doing that for this scenario here:

We can see that some squares have higher numbers than others, meaning they have a higher, though not guaranteed, probability of being a mine. Now, solving this scenario (right)....
# Of Mines Left
A rarely used tactic. Some boards have a number of mines remaining based on how many you've flagged, or you can count in your head. It's common sense but it can be a real time saver if you have unrevealed tiles at the end. Also is helpful for situations where there could be one or two mines, where you can pick out the scenario that has less mines.
A Bit Of Interesting Probability
What are the chances of getting an 8 in minesweeper on one board? This assumes we have a 16 by 16 board with 40 mines. There are 256 squares, but only 196 are eligible because the edge cannot be an 8. We need 20% of the mines to randomly be in donut formation. Also, the other 32 mines mustn't be interfering. Doing the math the chance of getting an 8 on a single 16 by 16 board is about 0.000000596%, or one in 1,677,570.
If you're interested, this video about minesweeper oddities is an interesting watch.
Outro
Hope you liked my minesweeper guide! I expect to see this blog linked to the top of the minesweeper minigame page by next week (hey, and I did have a dream about it getting 11 likes!) Overall it's a fun strategic game once you get the hang of it, and is fun to speedrun and gamble for interesting oddities. Thank you for reading, and see you in the next one!
- Melatonin-deprived Kilo
And you're only 1 like away from the 11