
Somewhat Simple HTML (Part 3)
First published: Saturday August 2nd, 2025
Report this blog
Welcome To...Part 3!
Never thought you would see another blog from me? Well, here we are!
This blog will focus on one thing - how to use classes and IDs. No long intro this time, let's start!


How To Use Classes and IDs
First of all, what's a class, and what's an ID?
An ID is a unique identifier you give to one element - and only one element! Trying to assign two elements the same ID will break your code and cause some issues. A class, however, can be assigned to several elements. Say you join your local chess club. The 'class' is the chess club all the members are part of, and your name is the unique 'ID'. If you have the same name as someone else, it'll cause a problem when you're called up for the tournament.
How to Assign Classes and IDs
Before using a class or ID, you need to assign it first. You can easily assign these by giving an element the class or ID attribute, placed inside the tag you're using (selector is an umbrella term I'll use for classes and IDs):
------------------------------------------------
<tag selectortype="name">content</tag>
------------------------------------------------
Use whatever tag you like: <p>, <div>, <span>, <h1>, or even the entire <body> element will work. After specifying the selector, you name your selector in quotation marks. Your content (which will be assigned whatever selector name you gave it) goes next, and finally the tag is closed off. Don't forget to include the '>' after your selector name.
------------------------------------------------
<div class="example">This is an example.</div>
------------------------------------------------
This is a <div> element with the 'example' class and some content.
You are also able to assign more than one class to an element, OR any number of classes and an ID (more than one ID is not allowed; this is useless). To assign more than one class, simply add a space and your second class (this means you can't have a space inside of one class name, or it becomes two classes). To assign a class AND an ID, you can just give the content both of those attributes.
------------------------------------------------
<div class="example test">This is an example.</div>
------------------------------------------------
This element part of both the 'example' and 'test' class.
------------------------------------------------
<div class="example" id=example1>This is an example.</div>
------------------------------------------------
This element has the 'example' class and 'example1' ID.
How to Get Classes and IDs
Assigning selectors is useless unless you fetch the selector and tell it what to do.
To assign a class:
------------------------------------------------
.className {codeHere}
------------------------------------------------
Use a period to tell the browser you're assigning a class. The code is nested inside of curly brackets. IDs are very similar:
------------------------------------------------
#idName {codeHere}
------------------------------------------------
You can put any code you like inside...IF it is valid CSS. You can't put any HTML in here.
And...that's it! But there are a few more selectors you can use, that are actually quite powerful.
Other Selectors
The format for most of these is similar to fetching classes/IDs. We can use the element selector to assign the CSS to everything inside that element. These are essential for easy styling, especially if you want to use external CSS to style several pages. For example:
------------------------------------------------
p {codeHere}
------------------------------------------------
This will target EVERY <p> element on the page. For example, if we used the code color: blue; here, everything inside a <p> element will be blue. Again, this works for any tag, even the entire <body>, which is useful for any elements you haven't styled yet. You can also assign several tags by separating them with a comma. If you want to assign style the ENTIRE page, you can use the universal selector (an asterisk, *).
Say you want to style every <span> element inside of a <div> element. You list them both but without a comma, you can use a descending selector:
------------------------------------------------
div span {codeHere}
------------------------------------------------
The tag furthest to the left is the 'highest tier' tag, then since <span> follows it, this code is targeting <span> elements inside of <div> elements. You can do this several times if you'd like to target even further.
Furthermore, you can use the not selector:
------------------------------------------------
tag:not(.class) {code}
------------------------------------------------
This will target every tag of your choice that does NOT have the class you entered.
There are many more selectors, such as sibling selectors, child selectors, attribute selectors, and more, which are useful for more advanced code. But wait...what happens if we use two selectors at the same time?
Priority
You may have noticed that you're able to target one element in different ways. You can use external CSS, internal or inline styles, ID and class selectors, and a universal selector all on a SINGLE element! How does the browser know what to use? You can't have an element that is both blue and green at the same time...
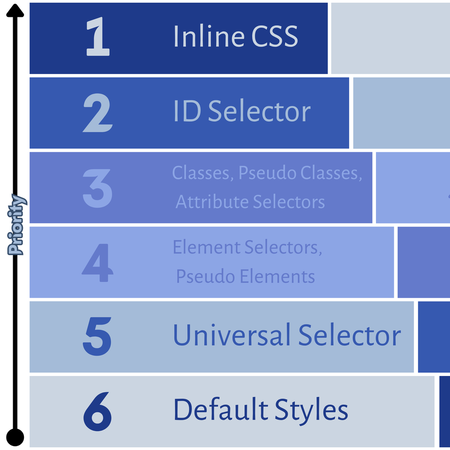
You may not know some of these, it's best you search them up. At the bottom we have our default styling, which is overridden by adding any styling at all. Next, we have our universal selector, so anything we style will ignore the universal selector:
------------------------------------------------
* {color: blue; padding: 10px;}
#color {color: green;}
-----------------
<div id=color>Test</div>
------------------------------------------------
This code runs two things: The universal selector, and the ID selector. The ID selector is more specific, so it will automatically override the universal selector's color property and make this text green. However, there is nothing to override the padding property, so the padding of the text will still be 10px until it's overridden. One more caveat to this:
------------------------------------------------
body {color: blue;}
p {color: green;}
-----------------
<body><p>Text</p></body>
------------------------------------------------
We're using the element selector for both the <body> and <p> element, but since the <p> element is more specific and nested inside the <body> element, the p selector will take over.
"Can I use the same selector twice?" you ask. Yes, you can. HTML, CSS, JavaScript, and other coding languages usually run top-to-bottom, so the latter selector will take over. There's really no point in doing this though, apart from organization or for advanced projects.
Coding is Complicated: !important
There's a way to mess with this order using something we call !important, which will basically override other styles so the priority pyramid doesn't get in the way. And yes, using !important on two selectors will cause the higher priority selector of the !important bunch to execute. To use it:
------------------------------------------------
selector {property: value !important;}
------------------------------------------------
!important goes right after your value (the color name, number of pixels, etc.) but before the semicolon. Now this property will be at the top of the pyramid until we give a higher selector !important. You can only use !important once.
Edit: Inline CSS overrides external and internal CSS, even without !important.
A Bit More
You can use selectors in the blog editor! While trying to run a code snippet from before, I accidentally turned all the text in the blog green! The text in JetPunk blogs uses the <p> tag, meaning if you use internal CSS you can easily change the color, font, or style however you like!
Important note, you must use the <style> tag in order to style using the stuff I've shown in this blog, unless you're using an external CSS file (highly recommended, it's very useful!). With that out of the way...
Outro
I've started to do some real coding (go to h*ll, JavaScript 😭) so I actually have a decent understanding of how this works, if you have any questions, found any inaccuracies, have feedback, want to request something in Part 4, you get the deal...feel free to leave a comment!
Quite fun writing this blog, but it was longer than I anticipated, and I haven't even covered everything. In Part 4, I'm planning on writing how to use selectors here on JetPunk, along with some CSS attributes that will be useful to use. Definitely more dynamic than just a bunch of selector yap (lol). I've sort of changed the format of this series; I don't like how the first two are just me listing tags and stuff. But hey, one day I'll look at this blog I currently believe is great and think it's a total mess.
- Procrastinating again, Kilo
Excellent work again Kilo! The effort is divine as always.
Have fun coding!
not the hyperlink because I am too stupid tho